Vagrant has proven itself to be an excellent tool for testing services and for application development. Most know that you can use it to stand up a server that mimics your production environment, but few know about its multi-server support. In this tutorial, I am going to show you how to stand up an entire application stack using Vagrant.
Every web application has an application server, which goes without saying. They also typically have a backend database server, and they may have a caching service, such as Redis, in front of everything.
With Vagrant’s multi-server support, we can stand up an entire environment that mimics production. The benefits are operations can test their configurations, and developers have something the better represents production.
Our Lab Environment
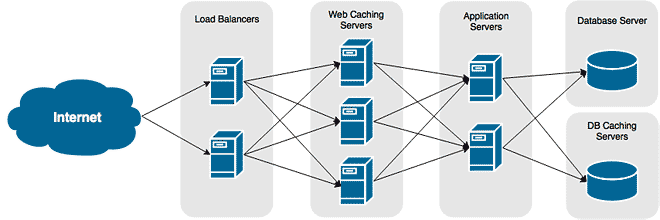
The environment in this tutorial will have the following infrastructure. We’ll be standing up a simple NodeJS Express API as an application with MongoDB as the database and Redis for caching.
The Vagrantfile
Being able to combine all of our servers into a single Vagrantfile makes it more portable and easier to manage. If you are already familiar with Vagrantfiles, learning how to add additional servers will be a breeze.
The following is a Vagrantfile that defines three servers: webapp, mysql, and redis. Each server uses the same Ubuntu 16.04 distribution, so we set that globally. Then, within each server, we customize the VM for its intended purpose.
Vagrant.configure("2") do |config|

    # All servers will run Ubuntu 16.04
    config.vm.box = "ubuntu/xenial64"
    config.vm.box_check_update = true

    # Create the NodeJS App Server
    config.vm.define "webapp" do |webapp|
        webapp.vm.hostname = "webapp"
        webapp.vm.network "private_network", ip: "192.168.50.30"
        webapp.vm.provider "virtualbox" do |v|
            v.name = "webapp"
            v.memory = 2048
            v.cpus = 2
            v.linked_clone = true
            v.gui = false
        end

        webapp.vm.provision "shell", inline: <<-SHELL
          sudo apt update
          sudo apt upgrade -y

          sudo apt install apache2 -y
        SHELL
    end

    # Create the MySQL Server
    config.vm.define "mysql" do |mysql|
        mysql.vm.hostname = "zk1"
        mysql.vm.network "private_network", ip: "192.168.50.31"
        mysql.vm.provider "virtualbox" do |v|
            v.name = "mysql"
            v.memory = 2048
            v.cpus = 1
            v.linked_clone = true
            v.gui = false
        end
        mysql.vm.provision "shell", inline: <<-SHELL
          sudo apt update
          sudo apt upgrade -y

          sudo apt install mysql-server -y
        SHELL
    end

    # Create the Redis Server
    config.vm.define "redis" do |redis|
        redis.vm.hostname = "redis"
        redis.vm.network "private_network", ip: "192.168.50.32"
        redis.vm.provider "virtualbox" do |v|
            v.name = "redis"
            v.memory = 2048
            v.cpus = 1
            v.linked_clone = true
            v.gui = false
        end
        redis.vm.provision "shell", inline: <<-SHELL
          sudo apt update
          sudo apt upgrade -y

          sudo apt install redis
        SHELL
    end

end
Same your settings and run the vagrant up command. Each server will be created, started and provisioned sequentially.
Starting your Vagrant environment
vagrant up
Managing Your Multi-Server Environment
With all of your servers running, you are going to need a method to interact with them individually. You may want to shell into a specific server or re-provision it. Luckily, we can specify a server when using Vagrant commands.
Starting Your Servers
You can either start all of your servers or just start a specific server.
Starting all servers
vagrant up
Starting a specific server
vagrant up webapp
SSH Into a Server
We use the vagrant ssh command to shell into our Vagrant servers. When only running a single server, you just run vagrant ssh. However, this won’t work in a multi-server setup. We need to specify the server we want to shell into.
vagrant ssh webapp
vagrant ssh mysql
vagrant ssh redis
Reprovision a Server
With provisioning, we can reprovision all of the servers or we can provision a specific server.
Provisioning all servers
vagrant provision
Provisioning a specific server
vagrant provision webapp


